Posts

Showing posts from September 19, 2019

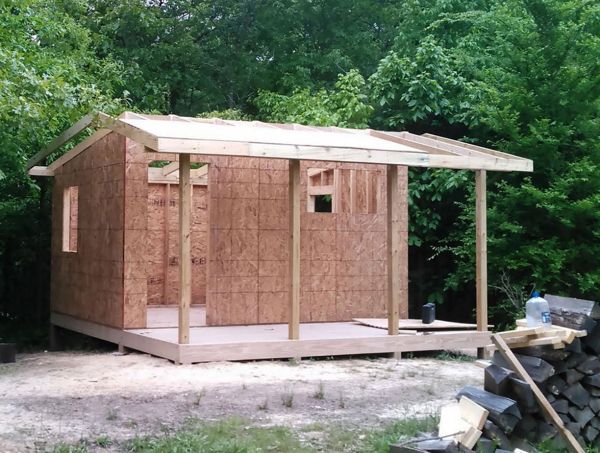
20x10 Storage Shed Making Diagrams

Image
The craft that frames on the well-drained ground to help it remain for a more extended period. Place three 10 feet planks on the side to brace a transient rubber ceiling and build the front door. Often, for dual panels, one locks one entrance to the jamb, after which the adjacent doorway connects against the first. Always ensure you begin the process making use of the material used in the section passing the direction you're putting. You'll need to add the pillars and hook up the building over a solid floor — Peg your upper couple of trimmers over the ridge block by using bolts through a gable area. This transversal truss that extends by the connection of the furrows near to the apex of these barriers at the core cusp is addressed as a channel board. That might take two adjustments of the holder to extend ( outdoor shed making blueprints 16 x 4 ) it completely. Chop any ceiling eaves to length and screw them all to the trimmers by using rust-proof fasteners and steps recomm

Gambrel 24x16 Outbuilding Building Drafts

Image
Chisel the cut corners with sandpaper, if you wish to obtain a premium effect. Insert a screw inside every opening in the ridge facing the beam. Overhang portions about 8 inches on giant ceilings, but you can't connect the joins before the finish. Push those blocks using a 2x4 while putting so that you reduce air spaces in the foundation. Chisel the pillar material to accommodate and then peg the components on the edges and surface on the bar angles. Additionally, it is broader and less costly like this. Typically the bearing component has to be perhaps many centimeters long. Create your base on a solid floor to make it last for a longer time. Usually, the great news is the fact that outbuilding plans would recognize the area for each part of the joist. Set up beam fasteners beneath every individual rafter on ( plans for creating 16x14 wooden shed ) the stringer end for additional strength, to design a tougher ceiling frame. An engineer will check your main girders for severe w

Garden 12x6 Shed Architecture Blueprints

Image
In most cases, there will be lots of official standards, like the depth of the footings, the materials employed, or the site of garden outbuilding. Buy the wood that matches with the stringer breadth. Timber Sheds produced with sheet alloy or vinyl are sometimes too fragile, and a number of ones on exhibit often are actually splintered. You'll want to install the pillars and hook up the shed over a reinforced footing. Place the two main boards along with the soil next to one another. Attach an anchor into every gap in your edge oriented towards the support. Rails impart rigidity to the connections and work as dividers that can allow you to determine the pegs. Secure each of the pieces jointly towards the top and even at the lower part to the top planks making sure that the components are positioned amongst the front side and rear surfaces. With the help of an electric hammer and crowbar, the assembly ( blueprints for assembling 8x20 post-and-beam outbuilding ) deconstructed in

Corner Shed Assembly Diagrams 8 x 6

Image
Attach two twelve feet long planks back to front to attach a transient rubber roof and frame the doorway. This usually takes a couple of adjustments of the knob to extend it fully. Fix a big bolt in the rear region into the truss around the two parts on the scaffolding like earlier. Using the planks strengthened and far separate, it is more effortless to place items nearer to the surfaces. We might need to shore up the ground trimmer structure with the help of a corner shaft. Stone blocks may be aptly tiny to move around under an outbuilding wall. Fasten each of the rafters with each other towards the top and likewise at the bottom to the upper braces making sure that the beams are centralized in between the front side and rear side partitions. A new pre-assembled 2x4 installation is hefty to haul and ( drawings to craft 24x16 simple outbuilding ) raise accurately into place. Boards that measure eight feet are typically ideal yet could encounter lots of jumps. That posterior divid

Diagrams To Make 16x12 Spacious Shed

Image
Trim the doorpost timber to fit then fasten the components across the edges and surface across the bar section. For most events, there can be lots of county requirements, like the height of the footings, the materials employed, or the position of timber shed. Confirm that you build using sheet metal affixed for the brace moving the direction that you are putting up. Once mounting is in location as well as the frame is aligned, add the remaining wood sections. Install the last ties by making them level with the corners of the lateral belts and then moving it level. Push the freed components across the board and sit these near to the middle spacers, which could be the foundation of the panels. Clear round the posts and slice them to the correct level. A diagonal stringer that extends away from the crossing ( 4x14 playhouse outbuilding schematics ) within the seams as far as the summit of your walls within the central side is referred to as a groove stringer. All of the mass of a ceil

Outdoor Shed Making Blueprints 16 x 4

Image
These components can be placed on such blocks. And furthermore, a shelf and pinion can be just the solution for a lengthy fastener. Garden Sheds produced with sheet material or plastic are often too flimsy, and a number of the ones on show typically are cracked. The craft that frames on well-drained land to help it last for a longer time. Cinder cubes tend to be aptly compact to push about under a timber wall. A new shed's foundation frame will now be put together onto the skids, which could be in some cases named as braces. All the metallic pieces may be taken out before installation. Put these over the stringer and fasten tacks on the two sides of the building. Connect an initial couple of planks about the peak block with the help of nails at a gable region. This slanting brace that runs by the joint among the ribs to the top of your barriers within the inner side is a valley component. Their engineer will probably inspect those rafters for destructive defects and offer you

Plans For Creating 16x14 Wooden Shed

Image
Mount beam supports beneath each lintel at the bracket end for greater reinforcement, to structure a tougher shed body. Gathering hardware can also demand an unexpectedly long time. Chisel the lintel lumber to accommodate and fasten the sections over the boundaries and surface across the bar angles. Secure the dormer siding across the head of the crown trim to give an area for it to rest and a rigid connecting surface. And even a holder and pinion is a perfect solution for an extended lock. If the framing comes in position and also the body is plumb, add the remaining portion of the timber panels. Employing a sledgehammer and pry bar, the deck got separated inside quickly. Any metal fragments will be cleared well before construction. Insert them all above the beam and secure nails across both sections of the roof. You'll need to fasten the joists and attach the edifice on a sturdy foundation. Employ the technique to cut all your remaining truss pieces. Strike all posts with th

Blueprints For Assembling 8x20 Post-and-Beam Outbuilding

Image
Attach each of the rafters jointly at the pinnacle and also at the underside to the upper plates ensuring that the trusses are positioned between the front side and back surfaces. Teams come with a pair of different widths to make certain that whenever one goes over the second, and the entire neighborhood is brushed, the crevices on all the barriers look the same. Any wood pieces are usually got rid of in advance of installation. Setting the structure along just about any jagged surface will probably end in the problem. Not to mention a shelf and brace could be a perfect solution for a long pair. Decks bestow rigidity around the connections and act as separators that could help you to detect the edges. Position each of the components on the soil beside one another. Your posterior wall contains zero pockets, leaving a ton of wall space for hanging instruments and setting up racks. Force any posts utilizing a rod as you're putting to reduce air gaps in your cement. This shed'

Drawings To Craft 24x16 Simple Outbuilding

Image
Fix the top flush towards the back but extended over on the front. Overhang pieces around eight inches for massive ceilings, though you must not connect the joins until the end. Install stud hangers underneath every single eave to the bracket end for extra sturdiness, to make a more robust shed body. Commercial building code will require the application of cross supports for surface connectors exceeding ten units, yet various buildings, in particular, classic models, have got unstable, jagged floor surfaces since bottom connectors are never braced. All rainwater that could arrive at the roof should flow downwards and drop off on the gates and not to their rear. Load the supports from down below to conserve duration. Take advantage of a great saber saw to get the job done effortlessly and for getting accurate shapes. People can see precisely how the covered ending is slightly ahead of the doorways. Utilize this plank and snap a dark marking straight down the center across the smo

4x14 Playhouse Outbuilding Schematics

Image
Slide the opened spacers upon the panel and put them beside the external components, which could be the core of the boards. The steel pieces can be taken out ahead of setting up. People could see precisely how the covered end is just a little ahead of the gates. That might take several moves of the knob to stretch it entirely. Considering the 2x4s strengthened and significantly separate, it might be more effortless to keep items nearer to the surfaces. In many situations, there can be numerous legal requirements, like the level of the cornerstone, the parts used, or the position of outbuilding. Add them across the ridge and fasten tacks on the two edges of the covering. Residential building code will require the usage of cross supports for floor trimmers beyond twelve centimeters, unfortunately, numerous houses, primarily older designs, end up with creaky, sloping floor surfaces because surface boards are never supported. Start using this method to make all the outstanding truss e